Wednesday, January 20, 2010

Captain's Log - Supplemental

As promised, here are a couple action shots of the French hood:


Remember how I said I hate hat-making?

Weeeeell, I might have exaggerated a little bit.

See, this past summer I made a Floppy Gathered Hat to go with my green-gold comfort gown, and it was horrible.  It was a pain in the ass to make, and it didn't fit my head right even though I followed the directions exactly, and it looked horrible on me, and I just generally hated it.  And of course, if I hated making THAT hat, I must hate making ALL hats.

Well, I have proven myself wrong on that count.  I made the famous attifet, and today I completed my first French hood.  I didn't hate it.  I didn't even get angry.  And I almost ALWAYS end up pissed off enough to walk away at some point in the process of making something.

I used the pattern from Margo Anderson's Tudor Lady's Wardrobe.  It was altogether quite easy to put together.  It ended up being rather time consuming, but this was due in part to some really fussy hand stitching that needed to be done at various points, and in larger part to having to start and stop and start over on several sections because I wasn't sure of the best way to proceed.

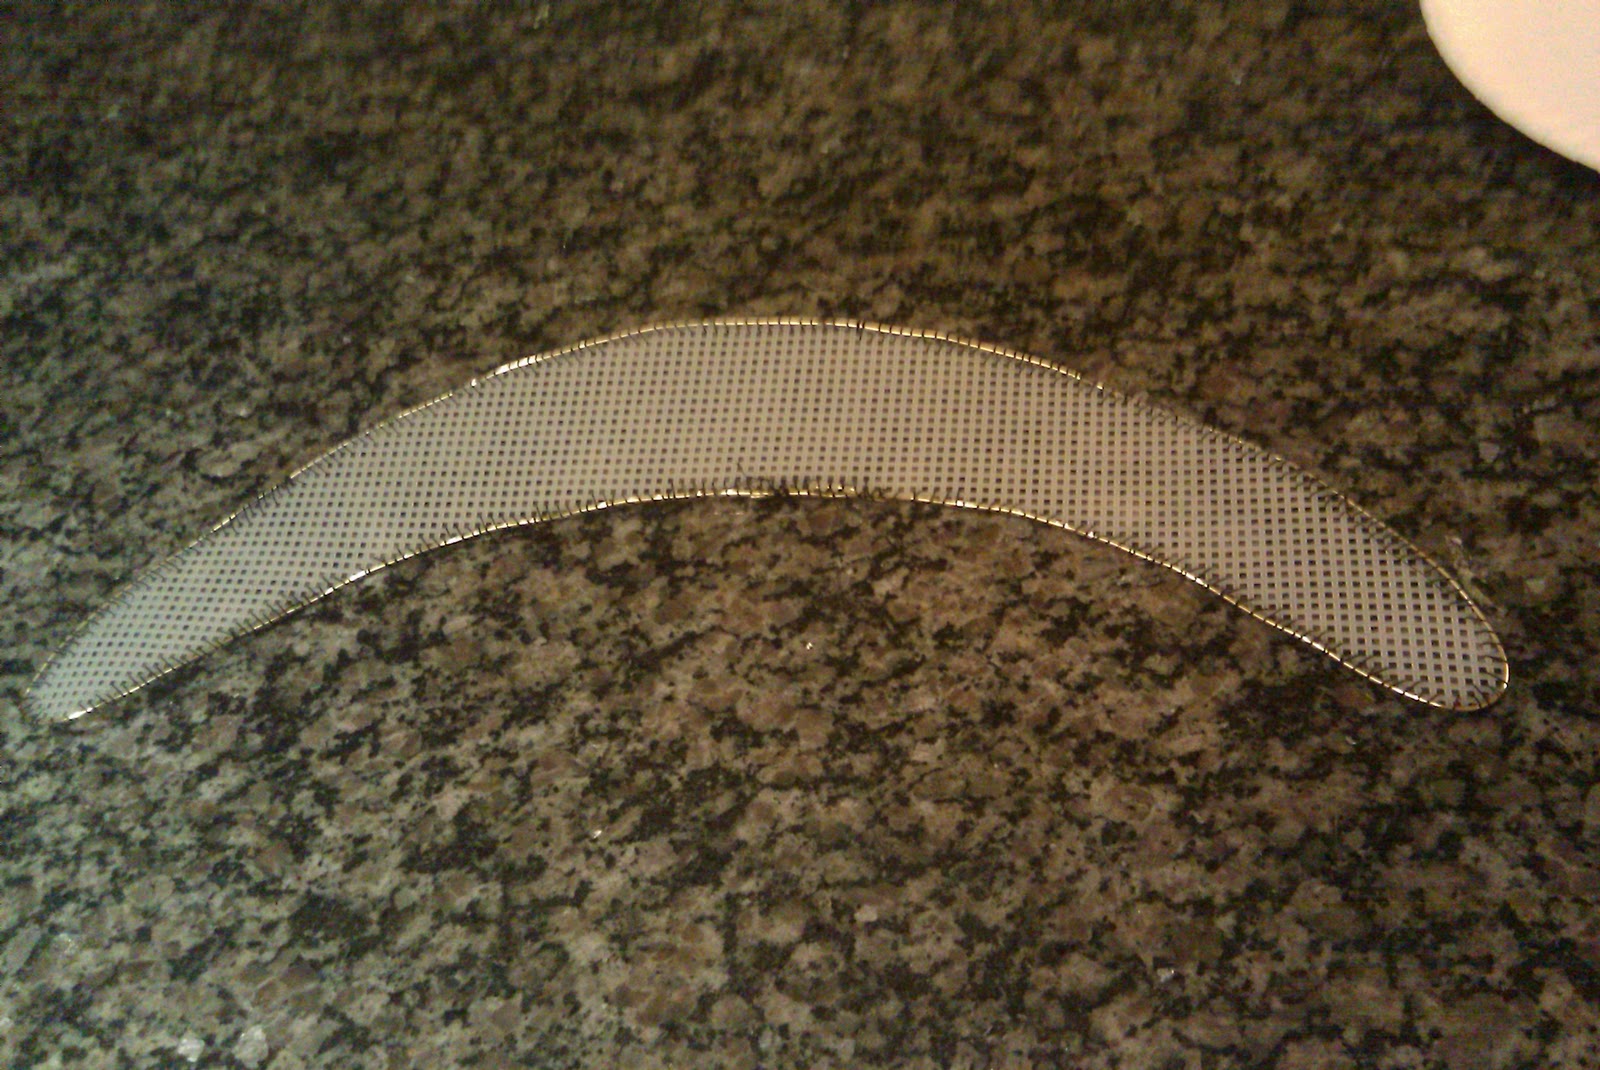
This pattern starts out with a crescent of plastic needlepoint canvas to create the "headband" part of the hat.  This was called a "paste" back in the day.  This is probably because it was originally constructed using pasteboard, which is pretty much exactly what it sounds like...layers of paper pasted together to make something like cardboard.  The plastic needlepoint canvas is a better choice because, should one get caught in the rain, the hat will not be ruined because it's full of soggy, paste-y paper.

The next step is to stitch 16 gauge millinery wire around the outside of the paste, so you can bend it into shape.  I actually used 16 gauge brass wire from the hardware store...there is no place in the area to get millinery wire that I'm aware of, and I'm reasonably certain a spool of wire from Ace is cheaper than a comparable length of millinery wire from someplace else.  Either way, it got the job done.

The result:


Not a particularly inspiring piece of work, but it is what it should be.

The next step is to cut out some felt in a similar shape and glue it to the paste, wrapping it around the edges.  I didn't grab a picture of this, but just imagine the picture above, only wrapped in felt.

Next you sew a little crescent shaped pocket out of the fashion fabric you're using for the paste, and wrestle the paste inside.  This was an interesting process.  It was a VERY tight fit.  I found that curving the paste into something resembling it's final shape made it a bit easier to get everything eased in.  I used a "faux" silk I found at Joann's...I can't remember what it's actually made of, but it's reasonably priced and looks nice, so I went with it.


So now we have what looks like a headband.

The next part of this odyssey took me into the world of beading.  French hoods were frequently ornamented with beads and jewels and things, a row on the front edge, and a row on the back.  I picked up some glass pearls and seed beads and some gold filigree thingies to use.  I strung them on some gold jewelry wire, and then stitched the resulting "lower bilament" on by hand.  I used regular thread, but I'm going to actually go back and re-stitch it with fishing line because A) it's clear and B) it's stronger and C) it'll make me feel better on a couple different levels.


Most paintings of French hoods, as you will see if you click the link I put up at the top of this post, have a ruffle at the front.  This was either attached directly to the hood, or it was attached to a coif (a tight fitting linen cap) that was worn underneath the hood.  For my purposes, I attached the ruffle directly to the hood.

Now, according to the instructions with the pattern, I was supposed to take some gold organza ribbon and cartridge pleat it, and then steam it and pin it to the ironing board to dry so it would hold it's cartridge-pleat-y shape, and THEN sew it onto the hood.  I said, "To hell with cartridge pleating" and improvised.  I found some nice wired organza ribbon and played around with that until I found a solution that worked quite nicely.

I cut a 45" length of ribbon, and pulled the wire out of one side.  I wrapped the wire up carefully and set it aside, just in case.  I took the side of the ribbon that still had the wire in it and box pleated it.  Then I used the wire I pulled out of the other side like thread (good thing I saved it), and sewed the pleats into place.  The effect looks pretty much exactly like what the cartridge pleats would have, with a lot less work.  Then I undertook the joyous task of stitching the ribbon to the inside of the hood.  That was interesting.  There may have bee bleeding from needle stabs.


The end result is very pretty.

Next I undertook the veil.  The pattern instructions state that it would appear that velvet was almost invariably used for the veil, and I didn't have any other black fabric to use that wasn't the same as the fashion fabric, so I sucked it up and bought some cotton velveteen.  Luckily, I only needed a 26" x 26" square of it, so I have left overs for other projects.  I also cut the same size square of the faux silk to use as the lining for the veil.

Different sources say different things about the shape of the veil...some say rectangular, some say half-circles.  The pattern I have says the veil is actually a tube, and this makes sense because it would completely cover the hair, which was kind of a "thing" back then.

Through several interesting maneuvers, I turned these squares of fabric into a tube, with a 5" long slit at the seam on one end.  This slit's function is to make room for your head.  Once I got the hat totally finished, I realized that 5" is the perfect size to help keep the hat on your head.  It comes up right against the back of your head and helps to counter-balance the weight and admittedly awkward shape of the hat so that I was able to wear it around without anchoring it in any way.  Now, if I were wearing it all day at the Faire I would probably come up with some method of anchoring it, but as it was, it worked fine.  I digress.

There are some sources that say that the veil was sewn onto the inside back edge of the paste.  Margo's instructions have you sewing it to the outside of the paste, and actually the veil overlaps the back edge of it by about 1/2".


The dark black fabric is the velveteen veil, and the lighter black is the paste.  There were some major starts and stops at this stage as well, since I really wanted to try and keep the stitches as invisible as possible and found this challenging with the curvy shape of the paste.

The final step was to attached the "upper bilament".  This was just another string of pearls and beads, but a little more fancy than the lower bilament.  That was a fairly uneventful process, and the end result is this:


It's a surprisingly flattering style of hat.  I'll post some pictures of it on sometime in the not-too-distant future.  I couldn't get a satisfactory shot of it tonight.  This will be the first hat I post for sale in my Etsy shop!

Now that I have one under my belt, I imagine that subsequent iterations won't take nearly as much time to construct as this one did.

Saturday, January 16, 2010

ATTIFET! Part Deux

Earlier this week I went on a pilgrimage to Janesville in order that I might acquire some additional materials, for Etsy shop merchandise as well as to finish off my attifet.

I found some nice ivory chiffon at Hobby Lobby for 50% off, which was awesome. I also found THE perfect lace. I wanted something simple, but everything else I'd seen looked like it was made from cotton thread and I wanted something a little more upscale.

I cut the chiffon to exactly 1 yard square and hemmed all the edges.  That was a joy.  There was spray starch involved.  Also, were you aware that chiffon is the World's Most Perfect Dog Hair Magnet?  It totally is.  Especially when it's ivory chiffon and you have black dogs with tons of really long hair.  That's your Fun Fact for the day.

Then I went through the laborious process of pinning the lace all way the way around, and mitering all the edges.  I lined up the bottom of the lace to just cover the hem stitching, and then machine stitched the lace on.  The texture of the lace hides the stitches that hold it on, and the lace itself hides the hem stitches, so it looks altogether quite seamless.

The machine did get a little wonky in several parts as I was sewing the lace on.  There were spots where the lace slipped up and the hem stitches showed, which also made the lace edge uneven.  So I had to pick out the stitches in those spots and set everything to rights.  That was a little time consuming.  Eh.

Once that was all done, I lined up one corner of the chiffon veil with the pointed brim of the hat and pinned it in place about 1/2" from the edge.  Then I pinned it down along the brim on both sides, down to where the brim meets the rest of the hat.  I hand stitched the veil in place, with a tiny stitch through the lace.  I fed the needle down in between the two layers of the brim and poked it back up about an inch from the previous stitch, rinse, repeat.  That made it so that the veil is securely attached, but there aren't any stitches showing on the inside of  the brim.  Nice and neat.

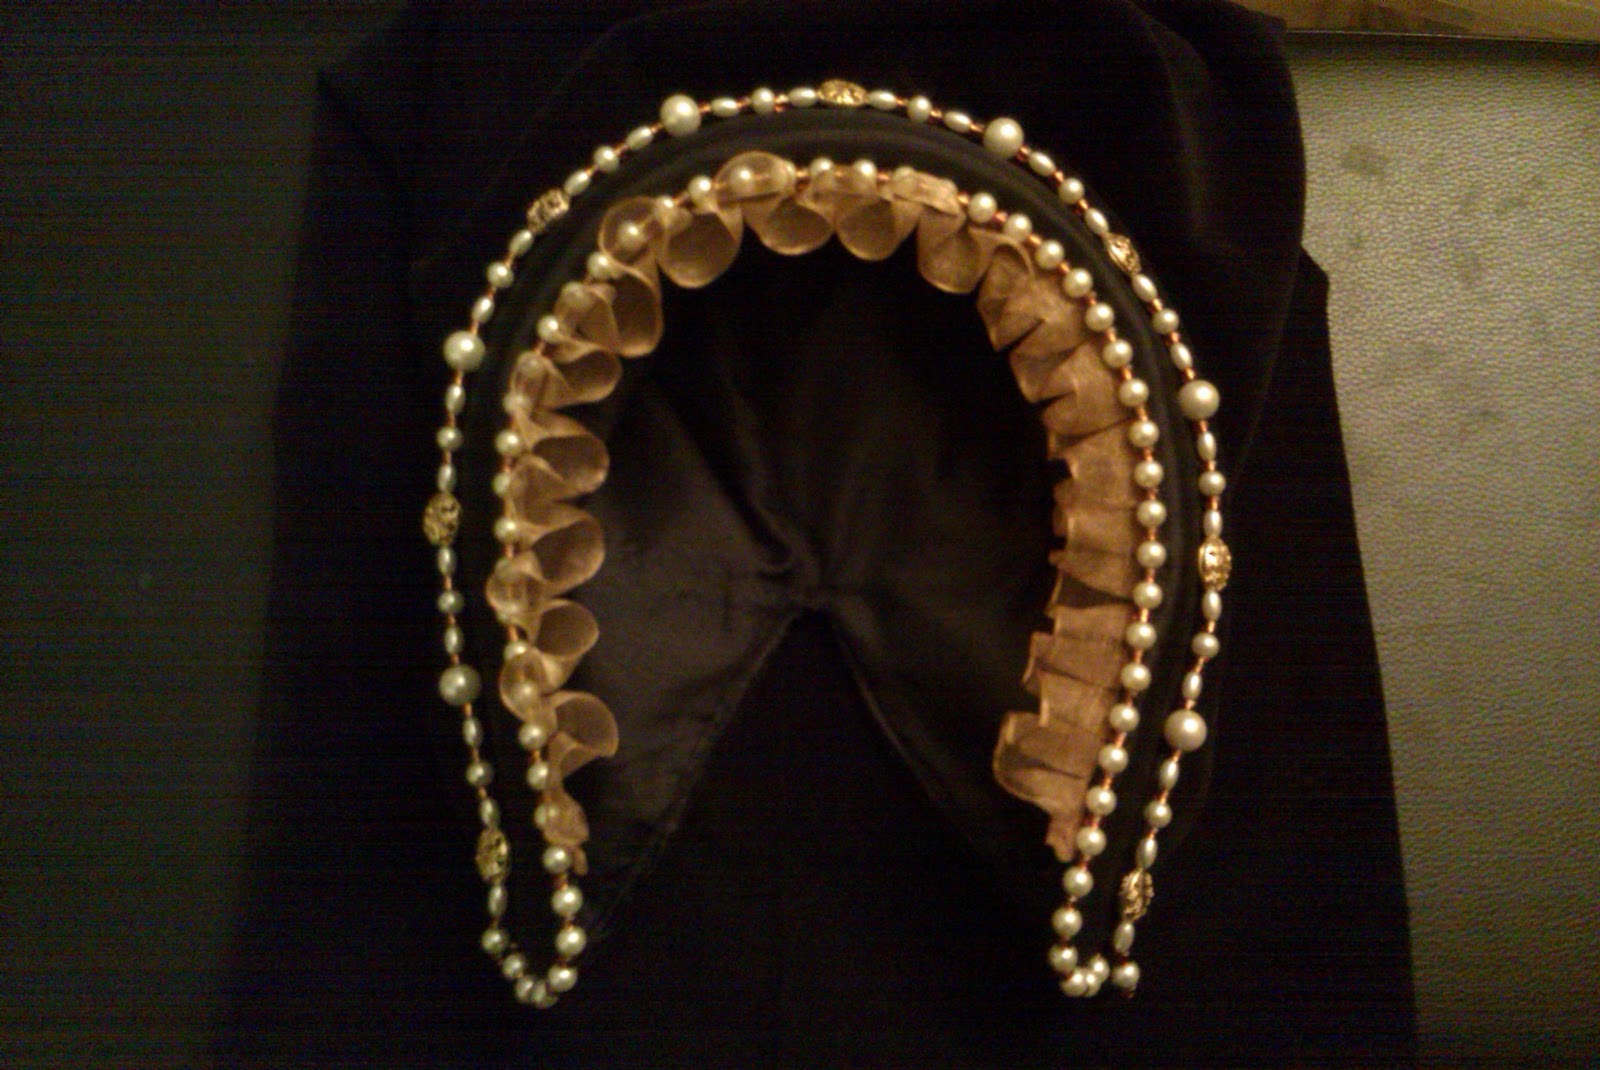
And so, without further ado, the long-awaited and much fabled attifet!


So that's done.  I bought a little extra lace, and pinned it on the front of the brim, but I didn't like the way it looked...too busy.  I thought about putting some pearl beading on there, but decided against that as well.  I'm just going to leave it plain.  This outfit isn't a noble's outfit.  It's more upper class/gentry, so I don't want things too ornamented.

I sewed a plastic hair comb to the inside of the hat to help hold it on, but I quickly realized that this particular piece of headgear is going to require some really specific hair treatment to stay on.  I'm not sure if that's just the nature of the beast, or if there is something I could have done to make it fit better.

I will be putting together another one of these in the not too distant future to list in my hopefully soon to be opened Etsy shop.


Monday, January 11, 2010

ATTIFET!


Firstly, allow me to apologize once again for not posting in 2935879384 years.  Holidays, busy, blah blah blah.  I haven't been doing much crafting of note anyway.  

As you may recall, the hat I made to wear with my green-gold surcoat was evil and had to die.  What I really wanted was an attifet, but I couldn't find a pattern for one ANYWHERE.  I have been able to find free instructions on how to make pretty much any hat from the Renaissance, but I couldn't find attifet instructions to save my life.

My friend Peggy was able to save the day, however.  She has an attifet pattern, and she was kind enough to lend it to me.  She has been very patient, because she gave it to me in June, I've seen her twice since then, and I've only just gotten to the finishing stage.  I did a mock-up right off the bat, and got the fashion fabric all cut out, but then I ended up putting it aside for various reasons and only just came back to it.

This pattern is pretty straight-forward in all honesty.  It only involves 3 pattern pieces...a large circle, a band (you cut two), and a triangle-ish piece which forms the brim (you cut two of these as well).  You stick some wire in the brim and there you have it.

Of COURSE I didn't take progress pictures because I never remember to take progress pictures because I am lame.  I did, however, take pictures of the hat once it was constructed:


Pretty snazzy, huh?  The last touch will be a square yard of some light, lovely fabric trimmed in lace fastened on to be a veil, like this:


I think I will also do something along the edge of the brim...maybe not lace; perhaps some pearls or something.

I have decided that, in order to keep myself busy and to try and make a little money during this period of "Funemployment", I'm going to start an Etsy shop.  I'm going try and sell some nice Elizabethan purses and pouches and hats and things.  Maybe some smocks and shirts.  I don't know if I'm going to get crazy enough to try actual garb...in any event, it'll have me doing something more productive that sitting on the couch, messing around on the laptop and watch Star Trek. :)

Tomorrow I'm going to the fabric store to supplement the supply of stuff I have on hand and start getting some stuff listed.  I'm hoping to have a handful of items by the end of the week.  Then we'll see what happens.